
Did you know that the infamous 90 cm (36”) hip size can look different on different people? Depending on individual features of the figure, two girls with the same measurements may need completely different pattern adjustments. For instance, both full and flat butt can have a circumference of 90 cm (36”).
In this article, we’re going to look at ways to adjust patterns to fit a flat bottom, taking your waist circumference into account (how to do it if you have a narrow waist, a close to the standard waist, or a waist wider than the standard measurement). And here you can find an article on adjusting your pattern to fit a full butt.
Attention! The width of the waist darts depends on the difference between the hip circumference and waist circumference while the location of these darts and the side seam shape depend on the shape of your buttocks and waist circumference.
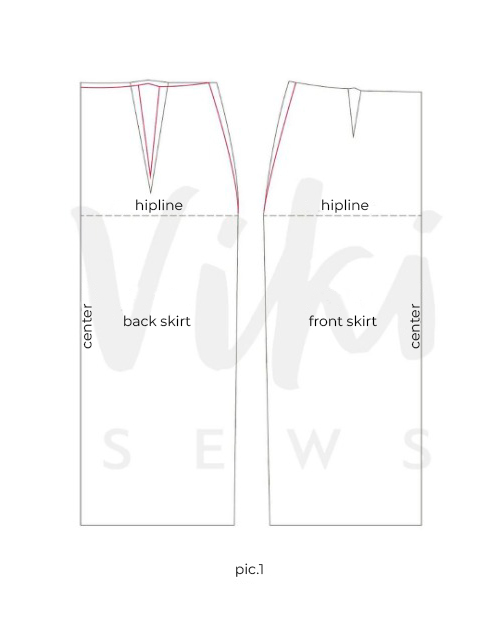
Case 1: flat bottom and standard waist
On the back skirt, reduce the dart intake by 1–2 cm (3/8–3/4”) (0.5–1 cm [1/4–3/8”] from each side). At the same time, you need to maintain the waist length, therefore take in 0.5–1 cm (1/4–3/8”) at the sides of both the front and back skirt. While doing so, make sure you maintain the original shape of the garment (pic.1).
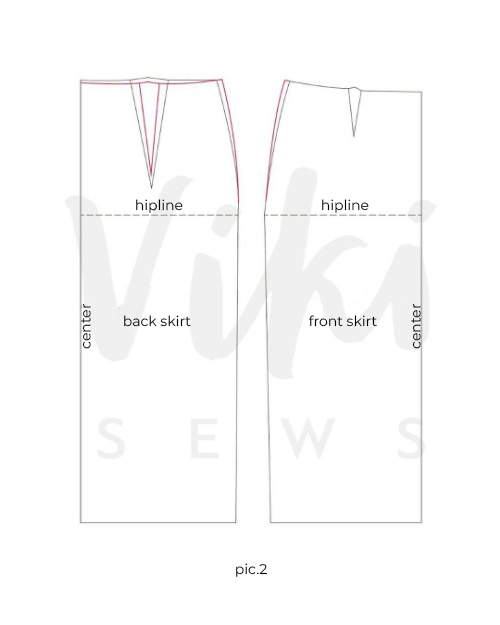
Case 2: flat bottom and waist wider than the standard measurement
First, you need to find the difference between your waist circumference and the standard one. For example, your 70.5 cm (27 ¾”) – standard 68 cm (26 ¾”) = 2.5 cm (1”). On the back skirt pattern piece, reduce the dart intake by 1–2 cm (3/8–3/4”) and connect the dots on the waistline. If the waist length has increased by the needed number, you can leave the side seam as it is. If not, add the remaining number to the side seam. Don’t forget to adjust the waistband as well.
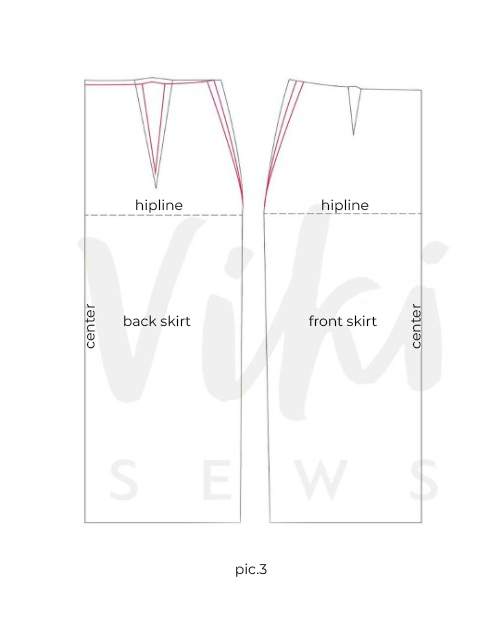
Case 3: flat bottom and narrow waist
Find the difference between your waist circumference and the standard one. For example, standard 76 cm (29 7/8”) – your 71 cm (28”) = 5 cm (just under 2”) / 2 side seams / 2 pieces = 1.25 cm (about ½”). On the back skirt pattern piece, reduce the dart intake by 1–2 cm (3/8–3/4”) and connect the dots on the waistline with a dart base. Adjust the side seams using the previously calculated number (pic.3). It means you need to push the side seam line 1.25+(0.5-1) cm (1/2”+[1/4-3/8”]) towards the center, depending on how much you’ve reduced the back waist dart intake. Don’t forget to adjust the waistband as well.
Note that if you’re reducing the dart intake, you need to shorten the dart as well. You will also need to adjust the height of the waistline on the back skirt. The waistline on the back has to be curved downwards, which makes the back skirt slightly shorter. If you have a flat bottom, you need this step to avoid excess fabric pooling in the back. In this case, the excess fabric may turn into multiple horizontal folds up to 1 cm (3/8”) in width.
Other articles on how to fix fitting issues:
Fitting: getting rid of excess volume in the back of the shorts


Здесь пока нет комментариев